Once you have the RaPi configured you may want to access your WiFi network. A word of warning: not all WiFi dongles work with the RaPi, before you attempt to configure your adapter look at this website to check compatibility.
The perquisite for this procedure is that you have access to the gui desktop of the RaPi, either by VNC through the wired ethernet port or by a HDMI monitor connected directly to the RaPi and mouse+keyboard connected to the RaPi via USB.
First you need to check and/or modify the network configuration file. Open LXTerminal and type the following command:
ifconfig
you should see text looking something like this
eth0 Link encap:Ethernet HWaddr b8:27:eb:37:12:2c
inet addr:xxx.xxx.xxx.xxx Bcast:xxx.xxx.xxx.xxx Mask:xxx.xxx.xxx.0
UP BROADCAST MULTICAST MTU:1500 Metric:1
lo Link encap:Local Loopback
inet addr:127.0.0.1 Mask:255.0.0.0
UP LOOPBACK RUNNING MTU:65536 Metric:1
wlan0 Link encap:Ethernet HWaddr 00:13:ef:c0:0d:4c
UP BROADCAST RUNNING MULTICAST MTU:1500 Metric:1
The first (left hand) part of each section shows the interface names, in the example above we have "eth0" (the wired ethernet port), "lo" (the internal loopback interface) and "wlan0" the wireless dongle.
For the remainder of this guide you whenever wlan0 is used you substitute the name you've found for your wireless dongle.
sudo nano /etc/network/interfaces
The find in the editor should look something like this:
auto lo
iface lo inet loopback
iface eth0 inet dhcp
allow-hotplug wlan0
iface wlan0 inet manual
wpa-roam /etc/wpa_supplicant/wpa_supplicant.conf
iface default inet dhcp
Pay particular attention to the middle 3 lines shown above and make sure wlan0 is replaced with the name of your wireless interface. The "wpa-roam ..." line is particularly important.
Note: when wpa-roam is used the interface must use "inet manual", DHCP is still working via the "iface default inet dhcp" line.
^O and ^X to save the file and exit.
Now reboot your RaPi.
For configuration without GUI (command line) see below.
When the reboot has finished, click on the Wifi Config Icon 
Once the application opens click the "Scan" button and you will see the following screen:
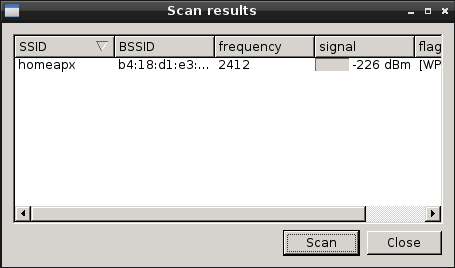
If your WiFi network is not already listed in the window click the Scan button and wait for a llittle while until your network appears. Once you see your network in the list double click on the SSID field in your network and you will see the following screen:
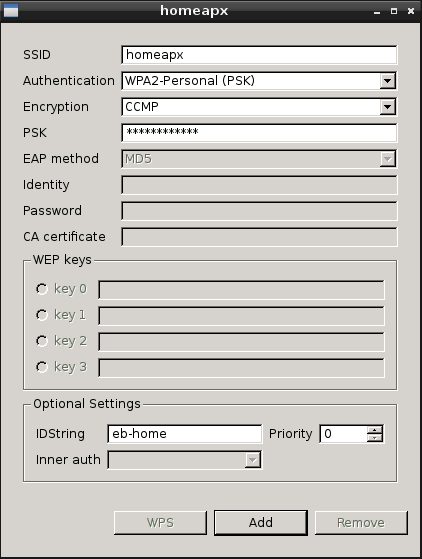
You need to put your WiFi network password in the "PSK" field and a descriptive type name in the "IDString" field. Click the "Add" button and you should come se the following window:
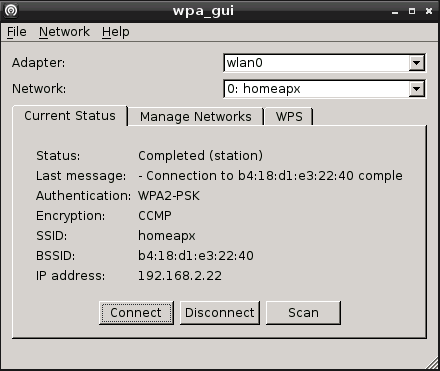
Note: It may take some time before the IP address appears.
To complete the WiFi configuration go to File -> Save Configuration:
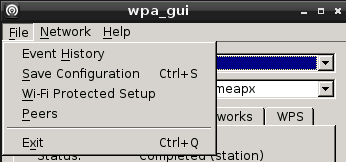
Exit the WiFi configuration application and reboot the RaPi
The RaPi should now connect to the WiFi network on startup.
Configuration without GUI:
sudo nano /etc/wpa_supplicant/wpa_supplicant.conf
ctrl_interface=DIR=/var/run/wpa_supplicant GROUP=netdev
update_config=1
network={
ssid="Wifi Network Name"
psk="Wifi Network Password"
proto=RSN
key_mgmt=WPA-PSK
pairwise=CCMP TKIP
group=CCMP TKIP
}
To connect to multiple networks you can have multiple "network" sections in wpa_supplicant.conf.